photo credit: jerryoldenettel NaBo11_50d_0004a via photopin (license)
iOS で印刷する機能を実装する方法について紹介する。
AirPrint とは
iOS や MacOS には、AirPrint という印刷の機能が備わっており、Wi-Fi 経由でプリンターへ印刷命令を出すことが出来る。
利用するには以下の易しい条件が満たされていれば良い。
- 端末のOSが iOS 4.2 以降、もしくは Mac OS X Lion 以降であること
- プリンターが AirPrint に対応していること (最近ではかなりのプリンターが対応している; AirPrint 対応機種一覧)
- iOS/MacOS 端末とプリンターが同一の LAN 内にあること
AirPrint で印刷する機能を実装する
UIPrintInteractionControllerクラスを用いて AirPrint で印刷する機能を実装できる。
let printController = UIPrintInteractionController.shared

let printInfo = UIPrintInfo(dictionary:nil)
printInfo.outputType = UIPrintInfoOutputType.general
printInfo.jobName = "Print Job"
printInfo.orientation = .portrait

// 印刷ページの設定
printController.printInfo = printInfo
// 印刷対象の設定
printController.printingItem = self.printingImage

// 印刷ページへ画面遷移させる
printController.present(animated: true, completionHandler: nil)
UIPrintInteractionControllerによって表示される印刷ページは次の様になっている。
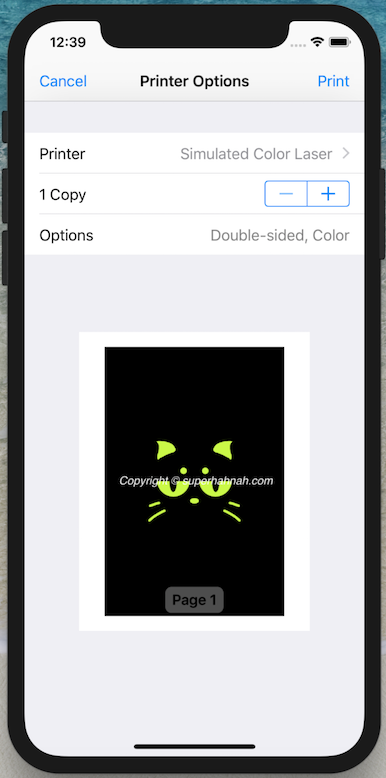
右上のPrintボタンをタップすると印刷がされる。
また、このページでは次のような設定も選べるようになっている
- 利用するプリンターの選択
- 印刷部数
- その他オプション(モノクロ印刷や、ホッチキス留めなど)
コード全体
GitHubにも置いておいた。
ViewController.swift
import UIKit

class ViewController: UIViewController {

    var printingImage: UIImage?

    override func viewDidLoad() {
        super.viewDidLoad()

        // 画像を表示。この画像を印刷したい
        self.printingImage = UIImage(named: "sampleImage.png")
        let imageView: UIImageView = UIImageView(image: self.printingImage)
        let imageAspect: CGFloat = (self.printingImage?.size.height)! / (self.printingImage?.size.width)!
        imageView.frame = CGRect(x: self.view.bounds.width * 0.05, y: self.view.bounds.height * 0.1, width: self.view.bounds.width * 0.9, height: self.view.bounds.width * 0.9 * imageAspect)
        self.view.addSubview(imageView)

        // 印刷ページへ遷移するためのボタン
        let printButton: UIButton = UIButton(frame: CGRect(x: 0, y: 0, width: 200, height: 60))
        printButton.center = CGPoint(x: self.view.center.x, y: self.view.bounds.height * 0.9)
        printButton.tintColor = UIColor.white
        printButton.backgroundColor = UIColor.blue
        printButton.setTitle("PRINT", for: .normal)
        printButton.addTarget(self, action: #selector(self.showPrinterView(_:)), for: .touchUpInside)
        self.view.addSubview(printButton)
    }

    // 印刷ページを表示する
    @objc func showPrinterView(_ sender: UIButton) -> Void {
        let printController = UIPrintInteractionController.shared

        let printInfo = UIPrintInfo(dictionary:nil)
        printInfo.outputType = UIPrintInfoOutputType.general
        printInfo.jobName = "Print Job"
        printInfo.orientation = .portrait

        printController.printInfo = printInfo
        printController.printingItem = self.printingImage

        printController.present(animated: true, completionHandler: nil)
    }

}
補足: シミュレーターについて
AirPrint 対応のプリンターを持っていない場合でも、プリンターのシミュレーターで動作確認することが可能だ。
導入方法は こちらの記事 を参照。


0件のコメント