photo credit: AJ Yakstrangler 28 Aug 2015 Redhill walk (22) via photopin (license)
iOS で フロントカメラとバックカメラを切り替える方法を紹介する。
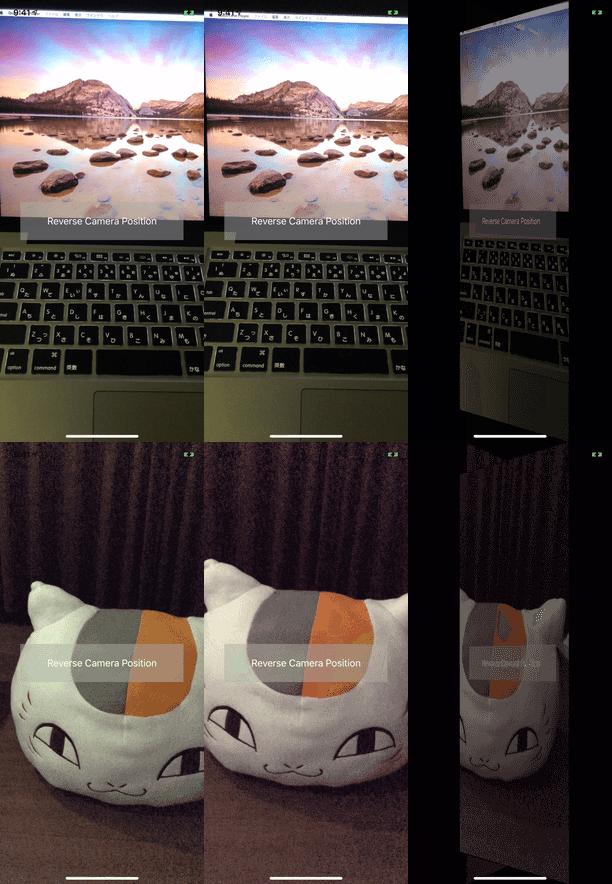
しかも切り替えの際、カメラ画面がくるっと 回転するカッコイイアニメーション付きだ。

動作環境
次の環境で動作することを確認している。
- Swift 4.2
- XCode 10.1
- iOS 12.1
サンプルコード全体
https://github.com/hahnah/til-swift/tree/master/CameraPositionChange
ViewController.swift
import UIKit
import AVFoundation

class ViewController: UIViewController {

    var captureSession: AVCaptureSession? = nil
    var videoDevice: AVCaptureDevice?

    var previewLayer: AVCaptureVideoPreviewLayer? = nil
    var reverseButton: UIButton = UIButton()

    override func viewDidLoad() {
        super.viewDidLoad()
        self.view.backgroundColor = UIColor.black
        self.setupCaptureSession(withPosition: .back)
        self.setupPreviewLayer()
        self.setupReverseButton()
    }

    func setupCaptureSession(withPosition cameraPosition: AVCaptureDevice.Position) {
        self.videoDevice = AVCaptureDevice.default(AVCaptureDevice.DeviceType.builtInWideAngleCamera, for: AVMediaType.video, position: cameraPosition)
        let audioDevice = AVCaptureDevice.default(for: AVMediaType.audio)

        self.captureSession = AVCaptureSession()

        // add video input to a capture session
        let videoInput = try! AVCaptureDeviceInput(device: self.videoDevice!)
        self.captureSession?.addInput(videoInput)

        // add audio input to a capture session
        let audioInput = try! AVCaptureDeviceInput(device: audioDevice!)
        self.captureSession?.addInput(audioInput)

        // add capture output
        let captureOutput: AVCaptureMovieFileOutput = AVCaptureMovieFileOutput()
        self.captureSession?.addOutput(captureOutput)

        self.captureSession?.startRunning()
    }

    func setupPreviewLayer() {
        // camera apreview layer
        self.previewLayer = AVCaptureVideoPreviewLayer(session: captureSession!)
        self.previewLayer?.frame = self.view.bounds
        self.previewLayer?.videoGravity = AVLayerVideoGravity.resizeAspectFill
        self.view.layer.addSublayer(self.previewLayer!)
    }

    func setupReverseButton() {
        // camera-reversing button
        self.reverseButton.frame = CGRect(x: 0, y: 0, width: 300, height: 70)
        self.reverseButton.center = self.view.center
        self.reverseButton.backgroundColor = UIColor.lightGray.withAlphaComponent(0.5)
        self.reverseButton.setTitle("Reverse Camera Position", for: .normal)
        self.reverseButton.setTitleColor(UIColor.white, for: .normal)
        self.reverseButton.setTitleColor(UIColor.lightGray, for: .disabled)
        self.reverseButton.addTarget(self, action: #selector(self.onTapReverseButton(sender:)), for: .touchUpInside)
        self.view.addSubview(self.reverseButton)
    }

    @objc func onTapReverseButton(sender: UIButton) {
        self.reverseCameraPosition()
    }

    func reverseCameraPosition() {
        self.captureSession?.stopRunning()
        self.captureSession?.inputs.forEach { input in
            self.captureSession?.removeInput(input)
        }
        self.captureSession?.outputs.forEach { output in
            self.captureSession?.removeOutput(output)
        }

        // prepare new camera preview
        let newCameraPosition: AVCaptureDevice.Position = self.videoDevice?.position == .front ? .back : .front
        self.setupCaptureSession(withPosition: newCameraPosition)
        let newVideoLayer: AVCaptureVideoPreviewLayer = AVCaptureVideoPreviewLayer(session: self.captureSession!)
        newVideoLayer.frame = self.view.bounds
        newVideoLayer.videoGravity = AVLayerVideoGravity.resizeAspectFill

        // horizontal flip
        UIView.transition(with: self.view, duration: 1.0, options: [.transitionFlipFromLeft], animations: nil, completion: { _ in
            // replace camera preview with new one
            self.view.layer.replaceSublayer(self.previewLayer!, with: newVideoLayer)
            self.previewLayer = newVideoLayer
        })
    }

}
実装解説
一部のコードについて簡単に解説していく。
ボタンが押されたときにreverseCameraPositionが呼び出されてカメラの切り替えが行われるように実装している。
    func reverseCameraPosition() {
        self.captureSession?.stopRunning()
        self.captureSession?.inputs.forEach { input in
            self.captureSession?.removeInput(input)
        }
        self.captureSession?.outputs.forEach { output in
            self.captureSession?.removeOutput(output)
        }

        // prepare new capture session & preview
        let newCameraPosition: AVCaptureDevice.Position = self.videoDevice?.position == .front ? .back : .front
        self.setupCaptureSession(withPosition: newCameraPosition)
        let newVideoLayer: AVCaptureVideoPreviewLayer = AVCaptureVideoPreviewLayer(session: self.captureSession!)
        newVideoLayer.frame = self.view.bounds
        newVideoLayer.videoGravity = AVLayerVideoGravity.resizeAspectFill

        // horizontal flip
        UIView.transition(with: self.view, duration: 1.0, options: [.transitionFlipFromLeft], animations: nil, completion: { _ in
            // replace camera preview with new one
            self.view.layer.replaceSublayer(self.previewLayer!, with: newVideoLayer)
            self.previewLayer = newVideoLayer
        })
    }
このreverseCameraPositionメソッドでは以下のことを行っている。
- 実行中のキャプチャーセッションを終わらせる
- 反対側のカメラを使った新しいキャプチャーセッションを作成・開始する
self.setupCaptureSession(withPosition: newCameraPosition) - 新しくプレビューを用意する;
newVideoLayer
(この段階では用意しただけで、まだ表示していない) - 画面を回転させ(
UIView.transition(...)、
回転が終わった時にプレビューを新しいものと入れ替える。
self.view.layer.replaceSublayer(self.videoLayer!, with: newVideoLayer)
ここでのポイントは回転させる処理にある。
        // horizontal flip
        UIView.transition(with: self.view, duration: 1.0, options: [.transitionFlipFromLeft], animations: nil, completion: { _ in
            // replace camera preview with new one
            self.view.layer.replaceSublayer(self.previewLayer!, with: newVideoLayer)
            self.previewLayer = newVideoLayer
        })
UIView.transition(with:duration:options:animations:completion:) メソッドを呼び出す際にoptions引数に[UIView.AnimationOptions.transitionFlipFromLeft]を指定することで、フリップのアニメーションが働く。
指定できるアニメーション一覧はUIView.AnimationOptionsに載っている。
completion引数にはアニメーション完了時に実施させたい処理を記述するのだが、ここで
self.view.layer.replaceSublayer(self.previewLayer!, with: newVideoLayer)
を呼び出すことで現在のプレビューを新しいプレビューに置き換える事ができる。


0件のコメント