この記事は Elm Advent Calendar 2019 12日目の記事です。
やりたいこと
elm-3d-scene を使って 3DCGプログラミングのはじめの一歩を踏み出したい。
elm-3d-scene は、
低レイヤーの実装(シェーダーとか、行列演算とか、他にも難しそうなものが色々…) を気にすることなく、簡単に楽しく 3DCGのプログラミングがElmでできる!!
(というのを目指している) らしい。
3DCGって難しそうだなと思っていたのだけれども、そう言うんだったら少しやってみようかなと思ったわけだ。
とりあえず、次の 2ステップで徐々に 3DCGプログラミングを分かっていきたい。
- elm-3d-scene を使って 3DCG の静止画を描画する
- elm-physics を使って物理演算(落下とか衝突とか) もやる
今回は elm-3d-scene のサンプルコードを参考にしながら 1 をやってみたので、それについて書いていく。
(2 は後日別記事にすると思う)
今回つくるもの
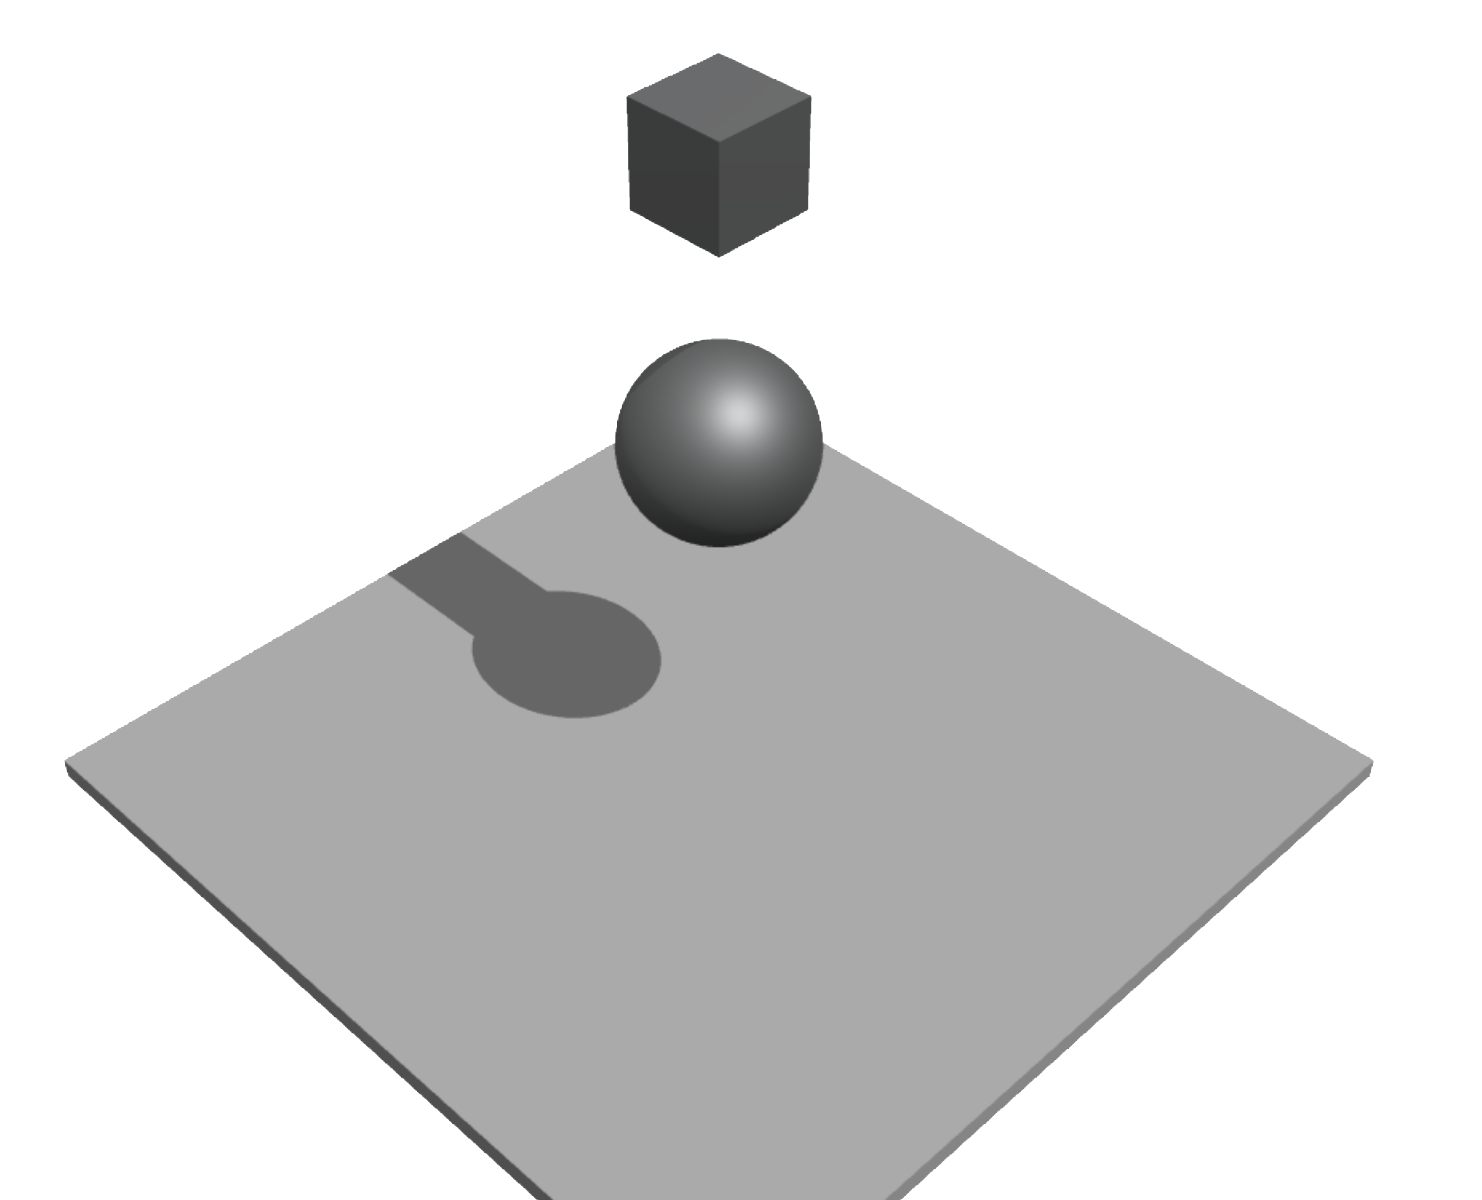
まず床があり、その上方に球体と箱が浮いている。というものを作っていく。
(浮いているだけ。落ちて衝突するといった、物理演算を使う部分までは今回やらない。)
環境
- Elm 0.19.1
- 2019年12月3日版の elm-3d-scene
準備
準備1. elm-3d-scene のダウンロード
elm-3d-scene は work-in-progress の状態であり、 Elm Package としてはまだパブリッシュされていない (2019年12月12日時点)。
利用するには GitHub からソースコードをダウンロードして自分のプロジェクトに組み込む必要がある。
今回は 2019年12月3日時点の elm-3d-scene を Clone してきて、必要な以下のファイルを自分のプロジェクトに組み込んで利用した。
src/Scene3d.elmsrc/Scene3d/*.elm
準備2. Elm Packages のインストール
elm-3d-scene の elm.json を確認して、依存している Elm Package を自分のプロジェクトにもインストールした。
elm-3d-scene の dependencies:
    "dependencies": {
        "avh4/elm-color": "1.0.0 <= v < 2.0.0",
        "elm/core": "1.0.0 <= v < 2.0.0",
        "elm/html": "1.0.0 <= v < 2.0.0",
        "elm-explorations/linear-algebra": "1.0.3 <= v < 2.0.0",
        "elm-explorations/webgl": "1.1.1 <= v < 2.0.0",
        "ianmackenzie/elm-1d-parameter": "1.0.1 <= v < 2.0.0",
        "ianmackenzie/elm-3d-camera": "2.0.0 <= v < 3.0.0",
        "ianmackenzie/elm-geometry": "3.0.0 <= v < 4.0.0",
        "ianmackenzie/elm-geometry-linear-algebra-interop": "2.0.0 <= v < 3.0.0",
        "ianmackenzie/elm-triangular-mesh": "1.0.2 <= v < 2.0.0",
        "ianmackenzie/elm-units": "2.2.0 <= v < 3.0.0"
    }
実装
大まかには、
- 物体を作る
- カメラと光源を作る
- 描画する
というのをやっていく。
1. 物体を作る
床と球体と箱を1つずつ作る。
まず、床は次のようにして作れる。
import Color
import Length exposing (Meters, meters)
import Scene3d.Mesh as Mesh exposing (Mesh, NoTangents, NoUV, ShadowsDisabled, ShadowsEnabled, Triangles, WithNormals)
import Scene3d.Shape as Shape
import Vector3d

type World
    = World

-- 床のメッシュを作る
floorMesh : Mesh World (Triangles WithNormals NoUV NoTangents ShadowsDisabled)
floorMesh =
    Shape.block (meters 8) (meters 8) (meters 0.2)

-- 床に使うマテリアルを作る
whitePlastic : Material
whitePlastic =
    { baseColor = Color.white, roughness = 0.25, metallic = False }

-- 床を作る
floor : Drawable World
floor =
    Drawable.physical whitePlastic floorMesh
        |> Drawable.translateBy (Vector3d.meters 0 0 -4)
メッシュというのは物体の形状を表すもので、マテリアルは質感を表すもののようだ。
メッシュとマテリアルを組み合わせて物体が出来上がる。
最終行のDrawable.translateByは床の位置を動かしている。
次に球体と箱を作る。これらも床を作るのとほぼ同じ要領。
-- 球体のメッシュを作る
sphereMesh : Mesh World (Triangles WithNormals NoUV NoTangents ShadowsEnabled)
sphereMesh =
    Shape.sphere { radius = meters 0.8, subdivisions = 72 }
        |> Mesh.enableShadows

-- 箱のメッシュを作る
blockMesh : Mesh World (Triangles WithNormals NoUV NoTangents ShadowsEnabled)
blockMesh =
    Shape.block (meters 0.9) (meters 0.9) (meters 0.9)
        |> Mesh.enableShadows

-- 球体と箱に使うマテリアルを作る
aluminum : Material
aluminum =
    { baseColor = Color.rgb255 233 235 236, roughness = 0.6, metallic = True }

-- 球体を作る
aluminumSphere : Drawable World
aluminumSphere =
    Drawable.physical aluminum sphereMesh
        |> Drawable.withShadow sphereMesh
        |> Drawable.translateBy (Vector3d.meters 0 0 -0.5)

-- 箱を作る
aluminumBlock : Drawable World
aluminumBlock =
    Drawable.physical aluminum blockMesh
        |> Drawable.withShadow blockMesh
        |> Drawable.translateBy (Vector3d.meters 0 0 2)
2. カメラと光源を作る
はじめにカメラから。
Camera3d.perspective(ianmackenzie/elm-3d-camera) でカメラを作る。
import Camera3d exposing (Camera3d)
import Direction3d
import Point3d
import Viewpoint3d

camera : Camera3d Meters World
camera =
    Camera3d.perspective
        { viewpoint =
            Viewpoint3d.lookAt
                { focalPoint = Point3d.meters 0 0 -2
                , eyePoint = Point3d.meters 10 10 10
                , upDirection = Direction3d.positiveZ
                }
        , verticalFieldOfView = Angle.degrees 30
        , clipDepth = meters 0.1
        }
次に光源を作っていく。
まずは環境光源。環境光源は空間全体を均等に照らす。
環境光源の作成にはScene3d.Light.overcastを使う。
import Scene3d.Light as Light exposing (AmbientLighting, Light)
import Luminance

ambientLighting : AmbientLighting World
ambientLighting =
    Light.overcast
        { zenithDirection = Direction3d.positiveZ
        , zenithLuminance = Luminance.nits 3000
        , chromaticity = Chromaticity.daylight
        }
別の光源も用意してやる。
環境光源だけだと陰影が生まれず、立体感がでないらしい。
ここではScene3d.Light.directionalを使って平行光源を作る。
import Illuminance exposing (lux)

sunlight : Light World
sunlight =
    Light.directional
        Chromaticity.daylight
        (lux 20000)
        (Direction3d.negativeZ
            |> Direction3d.rotateAround Axis3d.x (Angle.degrees -30)
        )
3. 描画する
ここまでで、
- 物体 (床、球体、箱)
- カメラ
- 光源 (環境光源、平行光源)
を用意してきた。
いよいよ、これらを使って描画していこう。
描画にはScene3d.render を用いる。
view : Model -> Html Msg
view _ =
    Scene3d.render []
        { ambientLighting = Just ambientLighting
        , lights = Scene3d.oneLight sunlight { castsShadows = True }
        , camera = camera
        , width = pixels 1024
        , height = pixels 768
        , exposure = Exposure.fromEv100 14
        , whiteBalance = Chromaticity.daylight
        }
        [ aluminumSphere
        , aluminumBlock
        , floor
        ]
できた!!
おわりに
今回は elm-3d-scene で 3DCGプログラミングのはじめの一歩を踏み出した。
(細かい部分の理解は大分スルーしたが…)
大雑把には、物体作る、カメラと光源作る、描画する、これだけ。
3DCGプログラミングの経験はほぼなかったが、elm-3d-scene (とサンプルコード) のおかげか、思ったよりも簡単にできた。
次は elm-physics を組み合わせて物理演算を追加していきたい。


0件のコメント